2023.03.19 - [Spring] - [Spring] MSA 프로젝트 만들기 (1)
[Spring] MSA 프로젝트 만들기 (1)
2023.02.28 - [Server] - [Spring] 마이크로서비스 아키텍쳐 (Micro Service Architecture, MSA) [Spring] 마이크로서비스 아키텍쳐 (Micro Service Architecture, MSA) 이번에 블록체인 기반의 프로젝트를 진행하게 되었는데
keylog.tistory.com
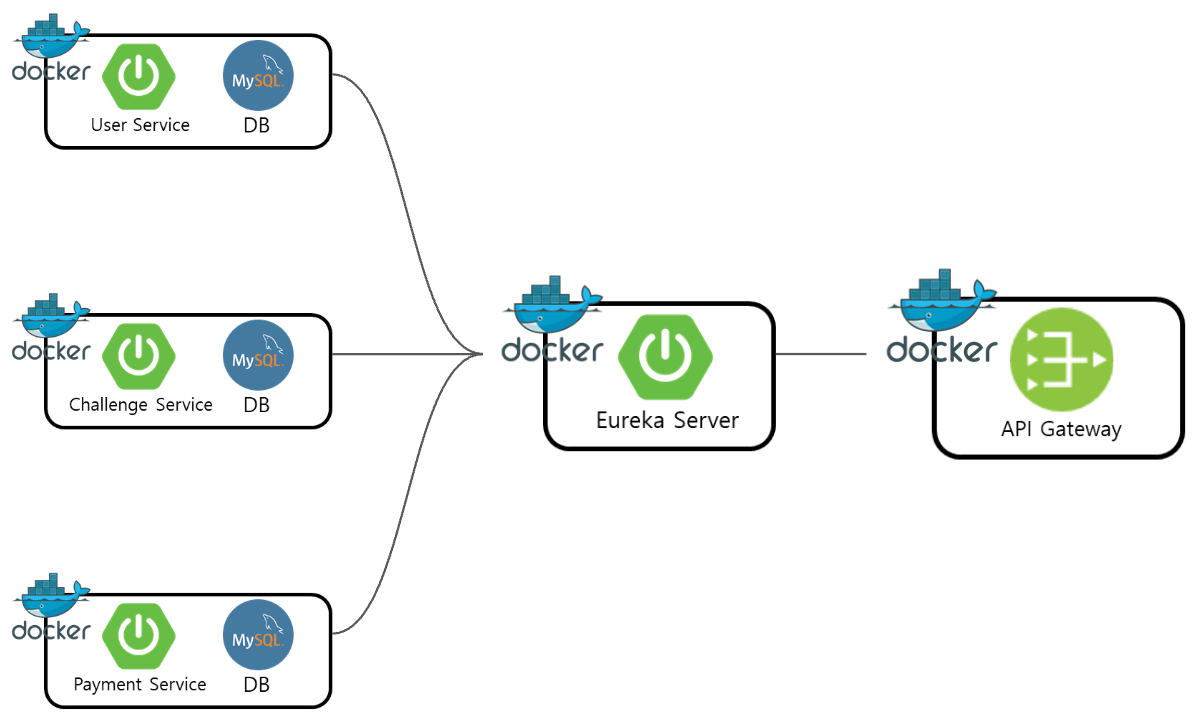
이전 글에서 gateway 프로젝트와 micro service 프로젝트를 생성하고 이를 Eureka Server에 등록하는 방법에 대해 알아보았습니다. 이번 글에서는 모든 클라이언트의 요청이 지나는 gateway-service에서 Custom Filter를 구현하여 권한이 필요한 요청에 인증된 회원의 요청만 전달되도록 하는 방법에 대해 알아보겠습니다.
먼저 MSA 구조에서는 세션 자체가 서버의 자원을 많이 소모하기도 하고 여러 마이크로 서비스들 간에 세션을 공유해주어야 하기 때문에 세션 방식을 권장하지 않습니다. 그렇기 때문에 gateway-service에서 JWT 토큰을 사용하여 사용자의 권한을 체크하는 방식으로 구현하겠습니다.
Dependency
gateway-service 프로젝트에 JWT 토큰을 사용하기 위한 jsonwebtoken Dependency와 Request에 포함된 Header 정보로 부터 전달된 토큰을 Base64로 인코딩/디코딩 할 때 사용하기 위한 jaxb-api Dependency를 추가해줍니다.
// JsonWebToken
implementation group: 'io.jsonwebtoken', name: 'jjwt', version: '0.9.1'

// Jaxb-api
implementation group: 'javax.xml.bind', name: 'jaxb-api', version: '2.2.4'
JWTUtil
Request Header로 부터 JWT 토큰을 가져오기 위한 메서드들을 정리해 놓은 JWTUtil 클래스를 작성해줍니다.
중간에 resolveToken() 메서드에서 HttpServletRequest가 아닌 ServerHttpRequest를 사용한 이유는 Spring Cloud Gateway는 기존의 임베디드 톰켓 기반의 Spring Boot Web 애플리케이션과는 다르게 Netty 기반의 비동기 통신을 지원하는 Spring WebFlux로 구현되어 있습니다. 그렇기 때문에 이렇게 비동기 방식으로 데이터를 사용할때는 ServerHttpRequest 객체를 사용합니다.
@Component
public class JWTUtil {

    @Value("${token.secret}")
    private String secretKey;

    @PostConstruct
    protected void init() {
        secretKey = Base64.getEncoder().encodeToString(secretKey.getBytes());
    }

    // 토큰에서 UserPk 추출
    public String getUserPk(String token) {
        return Jwts.parser().setSigningKey(secretKey).parseClaimsJws(token).getBody().getSubject();
    }

    // 헤더에서 토큰 추출
    public String resolveToken(ServerHttpRequest request) {
        String bearerToken = request.getHeaders().get(HttpHeaders.AUTHORIZATION).get(0);
        if (bearerToken != null && bearerToken.startsWith("Bearer ")) {
            return bearerToken.substring(7);
        }
        return null;
    }

    // 토큰의 유효성 + 만료일자 확인
    public void validateToken(String jwtToken) {
        Jws<Claims> claims = Jwts.parser().setSigningKey(secretKey).parseClaimsJws(jwtToken);
        claims.getBody().getExpiration();
    }
}
JwtAuthenticationFilter
AbstractGatewayFilterFactory를 상속받아 구현한 Custom Filter를 작성해 줍니다. 그리고 apply()라는 메서드에서 해당 필터에서 동작시키고자 하는 로직을 작성하여 Override 해줍니다.
apply() 메서드의 매개변수는 각각 ServerWebExchange 와 GatewayFilterChain이고 ServerWebExchange에서 ServerHttpRequest 객체를 가져올 수 있습니다. 그리고나서 JWTUtil 클래스를 이용하여 전달받은 ServerHttpRequest에서 JWT Token을 가져오고 유효성검사를 통과하면 토큰으로부터 userId 값을 추출합니다. 추출된 userId 값은 Request Header에 실려 마이크로 서비스로 전달됩니다.
Spring Cloud Gateway는 MVC의 Controller를 사용하지 않으므로 우리가 스프링 단에서 에러를 커스텀 할 때 사용했던 @RestControllerAdvice 나 @ExceptionHandler 를 사용할 수 없습니다. 대신에 아래와 같이 webflux에서 사용할 수 있는 ErrorWebExceptionHandler 인터페이스를 구현하여 에러처리를 할 수 있습니다.
- ExpiredJwtException : JWT의 유효기간이 초과
- MalformedJwtException : 잘못된 JWT 구조
- SignatureException : JWT의 서명실패(변조 데이터)
- UnsupportedJwtException : JWT가 예상하는 형식과 다른 형식이거나 구성
@Component
@Slf4j
public class JwtAuthenticationFilter extends AbstractGatewayFilterFactory<JwtAuthenticationFilter.Config> {

    private JWTUtil jwtUtil;

    @Autowired
    public JwtAuthenticationFilter(JWTUtil jwtUtil) {
        super(Config.class);
        this.jwtUtil = jwtUtil;
    }

    public static class Config {

    }

    @Override
    public GatewayFilter apply(Config config) {
        return (exchange, chain) -> {
            ServerHttpRequest request = exchange.getRequest();

            // 헤더에서 토큰 뽑아오기
            String accessToken = jwtUtil.resolveToken(request);

            // 유효한 토큰인지 확인합니다.
            jwtUtil.validateToken(accessToken);

            String userId = jwtUtil.getUserPk(accessToken);
            exchange.getRequest().mutate()
                    .headers(httpHeaders -> httpHeaders.add("userId", userId)).build();

            return chain.filter(exchange);
        };
    }

    @Bean
    public ErrorWebExceptionHandler tokenValidation() {
        return new JwtTokenExceptionHandler();
    }

    public class JwtTokenExceptionHandler implements ErrorWebExceptionHandler {

        private String getErrorCode(int errorCode) {
            return "{\"errorCode\":" + errorCode +"}";
        }

        @Override
        public Mono<Void> handle(ServerWebExchange exchange, Throwable ex) {

            int errorCode = 500;
            if (ex.getClass() == NullPointerException.class) {
                errorCode = 401;
            } else if (ex.getClass() == ExpiredJwtException.class) {
                errorCode = 402;
            } else if (ex.getClass() == MalformedJwtException.class) {
                errorCode = 403;
            } else if (ex.getClass() == SignatureException.class) {
                errorCode = 404;
            } else if (ex.getClass() == UnsupportedJwtException.class) {
                errorCode = 405;
            }

            byte[] bytes = getErrorCode(errorCode).getBytes(StandardCharsets.UTF_8);
            DataBuffer buffer = exchange.getResponse().bufferFactory().wrap(bytes);
            return exchange.getResponse().writeWith(Flux.just(buffer));
        }
    }

}
CorsConfiguration
@Configuration
public class CorsConfiguration {
    private static final String ALLOWED_HEADERS = "authorization, Content-Type, Content-Length, Authorization, credential, X-XSRF-TOKEN";
    private static final String ALLOWED_METHODS = "GET, PUT, POST, DELETE, OPTIONS, PATCH";
    private static final String EXPOSE_HEADERS = "*, Authorization";
    private static final String MAX_AGE = "7200"; //2 hours (2 * 60 * 60)

    @Bean
    public WebFilter corsFilter() {
        return (ServerWebExchange ctx, WebFilterChain chain) -> {
            ServerHttpRequest request = ctx.getRequest();
            String origin = request.getHeaders().getOrigin();

            if (CorsUtils.isCorsRequest(request)) {
                ServerHttpResponse response = ctx.getResponse();
                HttpHeaders headers = response.getHeaders();

                if (origin.startsWith("http://localhost:3000") || origin.startsWith("http://j8c209.p.ssafy.io")) {
                    headers.add("Access-Control-Allow-Origin", origin);
                }

                headers.add("Access-Control-Allow-Methods", ALLOWED_METHODS);
                headers.add("Access-Control-Max-Age", MAX_AGE);
                headers.add("Access-Control-Allow-Headers", ALLOWED_HEADERS);
                headers.add("Access-Control-Expose-Headers", EXPOSE_HEADERS);
                headers.setAccessControlAllowCredentials(true);
                if (request.getMethod() == HttpMethod.OPTIONS) {
                    response.setStatusCode(HttpStatus.OK);
                    return Mono.empty();
                }
            }
            return chain.filter(ctx);
        };
    }
}
서로 다른 출처(origin)의 요청을 허용해 주기 위한 CorsConfiguration 클래스입니다. 처음에 Spring Cloud Gateway 공식 문서 처럼 application.yml 파일에서 아래와 같이 cors 설정을 했었는데 그래도 cors 에러가 떴습니다.
개발자 도구에서 network를 열어보니 응답 헤더에서 Access-Control-Allow-Origin 값이 빠져있었습니다. 그래서 위와 같이 직접 Config 클래스를 생성해서 헤더에 해당 값을 더해주었고 Access-Control-Allow-Credentials 값을 true로 설정해 주었습니다.
추가로 프론트 단에서도 아래와 같이 Credentials 값을 true로 설정해줌으로써 문제를 해결할 수 있었습니다.

https://cloud.spring.io/spring-cloud-gateway/reference/html/#cors-configuration
Spring Cloud Gateway
This project provides an API Gateway built on top of the Spring Ecosystem, including: Spring 5, Spring Boot 2 and Project Reactor. Spring Cloud Gateway aims to provide a simple, yet effective way to route to APIs and provide cross cutting concerns to them
cloud.spring.io
spring :
  cloud :
    gateway:
      default-filters:
        - DedupeResponseHeader=Access-Control-Allow-Origin Access-Control-Allow-Credentials
      globalcors:
        corsConfigurations:
          '[/**]':
            allowedOrigins:
              - "http://j8c209.p.ssafy.io/"
              - "http://localhost:3000/"
            allow-credentials: true
            allowedHeaders: '*'
            exposedHeaders: '*'
            allowedMethods:
              - POST
              - GET
              - PUT
              - OPTIONS
              - DELETE
application.yml
마지막으로 작성한 필터를 아래와 같이 권한 검증이 필요한 API에 JwtAuthenticationFilter를 추가하여 마이크로 서비스로 요청이 전달되기 전에 토큰의 유효성 검사를 실시하도록 합니다.
server:
  port: 8000

eureka:
  instance:
    prefer-ip-address: true
    instance-id: ${spring.application.name}:${spring.application.instance_id:${server.port}}
  client:
    register-with-eureka: true
    fetch-registry: true
    service-url:
      defaultZone: http://localhost:8761/eureka

spring:
  profiles:
    include: jwt
  application:
    name: apigateway-service
  cloud:
    gateway:
      routes:
        - id: user-service
          uri: lb://USER-SERVICE
          predicates:
            - Path=/user-service/auth/**
            - Method=GET, POST, PATCH, DELETE
          filters:
            - RemoveRequestHeader=Cookie
            - RewritePath=/user-service/(?<segment>.*), /$\{segment}
            - JwtAuthenticationFilter
        - id: user-service
          uri: lb://USER-SERVICE
          predicates:
            - Path=/user-service/**
            - Method=GET, POST, PATCH
          filters:
            - RemoveRequestHeader=Cookie
            - RewritePath=/user-service/(?<segment>.*), /$\{segment}
이번 글에서는 Spring Cloud Gateway에서 AuthenticationFilter를 구현하는 방법과 CORS 설정을 추가하는 방법까지 알아보았습니다. 다음 글에서는 마이크로 서비스 간에 통신하기 위해 사용하는 RestTemplate과 FeignClient에 대해서 알아보겠습니다.
'Spring' 카테고리의 다른 글
| [Spring] 비동기 통신과 데이터 동기화를 위한 카프카 활용 (1) (0) | 2023.04.11 |
|---|---|
| [Spring] MSA 프로젝트 만들기 (3) (0) | 2023.03.24 |
| [Spring] MSA 프로젝트 만들기 (1) (0) | 2023.03.19 |
| [Spring] 통합테스트와 Junit과 Mockito 프레임워크를 이용한 단위테스트 작성 (0) | 2023.03.12 |
| [Spring] ThreadLocal이란? (0) | 2023.03.08 |